Week 12: Voice controlled assistants
Voice controlled assistants have quickly become commonplace. Many homes have an Alexa or Google Home controlling everything from lighting to media, and even timekeeping.
The technology these devices run on is available—at least in part—to everyone. Google’s Assistant SDK allows you to use the service on your own devices. This tutorial covers how to set up the Google Assistant on your Raspberry Pi, and voice activate an LED via GPIO pins.
Hardware Required for a Raspberry Pi Home Assistant
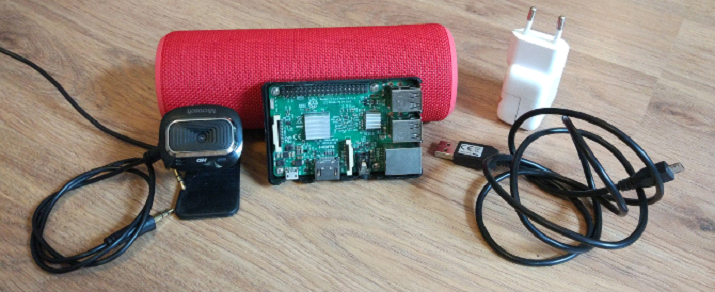
You Will Need:
⦁ Raspberry Pi with a fresh Raspbian install on the SD card.
⦁ USB webcam or microphone.
⦁ External speaker.
⦁ Circuit from the Pi LED tutorial (optional)
⦁ A browser signed into your Google account.
Note: The equipment for this tutorial can vary somewhat. I used a spare USB webcam purely for its microphone. Any compatible webcam or microphone should do fine, and there are extensive lists of Pi-compatible devices to help.
Also, I am using the 3.5mm output for audio. HDMI and other output sources will also work, though it will require modifications to the sound setup below.
Plug in the USB webcam and speaker, and set up the LED circuit if you are using it.
Setting Up the Sound
This tutorial can be followed directly on the Pi or via an SSH connection into the Pi.
Both ways begin in the terminal, to check the sound settings. Use the commands arecord -l and aplay -l to list available devices.
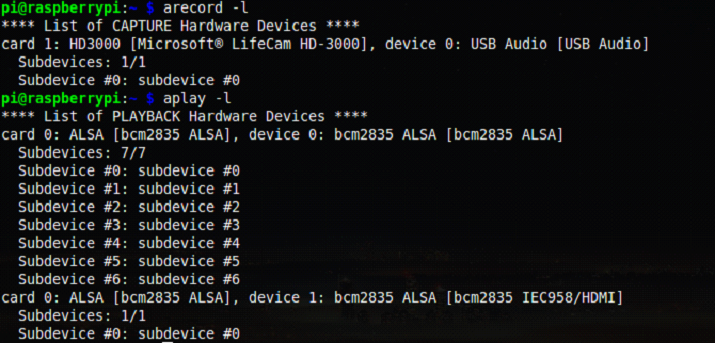
The image above shows the USB webcam as card 1 and device 0. Take note of the card and device numbers for both microphone and speaker output.
Now, making sure you are in the /home/pi directory, create a new file and open it in nano:
sudo nano .asoundrcThe contents of this directory will differ depending on what card and device numbers you are using. This is where you can choose to favor HDMI output rather than 3.5mm if you wish.
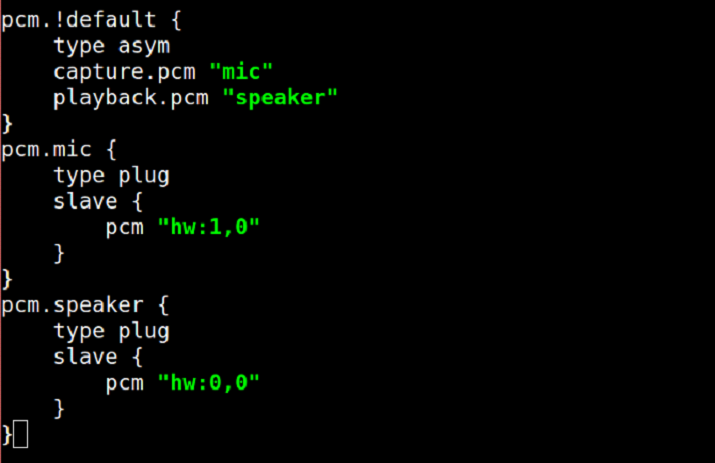
When you’ve entered your version of the above code, press Ctrl + X to save and exit.
Test your setup by recording and playing back a short clip:

Optional Step: If you want to change the input volume of your microphone, open alsamixer and press F6 to cycle between devices.
That’s it! The sound is set up.
Creating the Google Project
Open the Pi’s browser, alternatively, if you are connected via SSH open a browser locally. Navigate to the Google Action Console and click New Project.
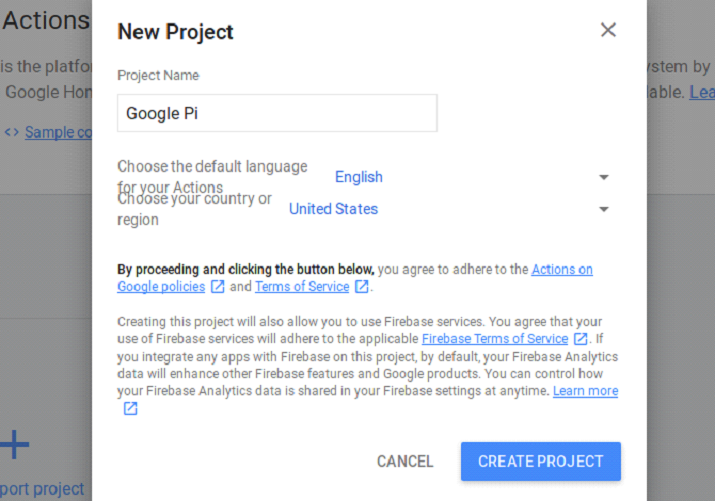
This may take a few moments. When finished, leave the window active and open a new tab—we’ll be coming to this in a moment.
Enabling the Google Assistant API
There are a few online adjustments you’ll need to make to continue. Navigate to the Google Assistant API website and click Enable.
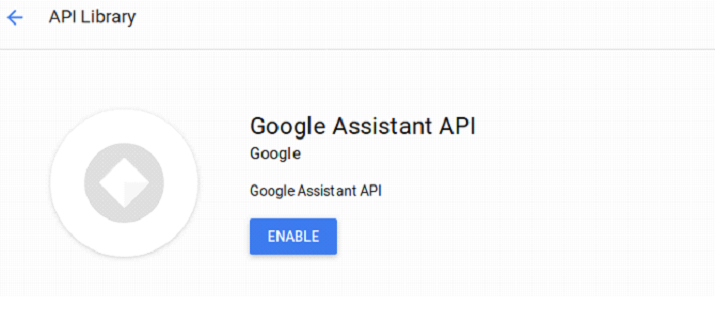
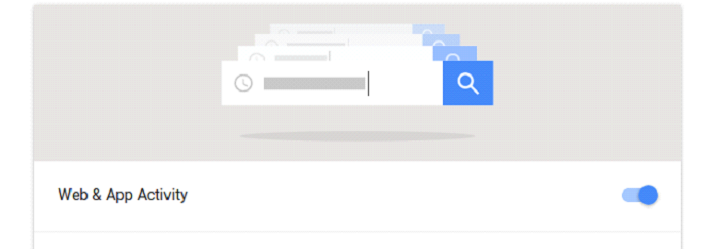
The project also requires activity permissions. Head to your Activity Control panel and make sure the following activities are turned on:
⦁ Web & App Activity (including Chrome History checkbox)
⦁ Device Information
⦁ Voice and Audio Activity
Now you can move on to registering the device.
Registering Your Raspberry Pi
Back in the Action Console, select Device registration from the left panel. Under Product create an easy to remember name for your device. The manufacturer name isn’t important (but must be there), and select Auto for the device type.

Click Register Model, and on the next screen click Download OAuth 2.0 Credentials. This downloads a JSON file to your computer. If you aren’t familiar with JSON files, don’t worry, but learning how to use JSON is worth doing for the future!
JSON Python Parsing: A Simple Guide JSON Python Parsing: A Simple GuideThere are libraries and tool-kits available for parsing and generating JSON from almost any language and environment. This article concentrates on methods and issues arising from JSON python parsing.READ MORE
The official Google guide recommends moving the file to /home/pi, so open the file manager and do this now.
Extra step for SSH users:
If you are using SSH you will have downloaded the JSON file to your local machine instead of the Pi. To transfer it, open a separate terminal window with no SSH connection. From this window, copy over the client secret JSON file using this command:
scp ~/Downloads/client_secret_client-id.json pi@raspberry-pi-ip-address:/home/pi/Replace “raspberry-pi-ip-address” with your Pi’s ip address, and don’t forget the colon before the path. If you downloaded the JSON file to another location modify your local path to reflect this. Enter your password when prompted, and the file will copy to the Pi’s home directory.

Switch back to the SSH terminal, and navigate to /home/pi. Enter ls -l to list the files in the directory. You should see the transferred client secret JSON file.
Installing the SDK
Google recommends working in a Python virtual environment. Create a new virtual environment called env.
If you’ve never done this before, this tutorial will help you learn how to use Python virtual environments.
Install the latest versions of Pip, Setuptools and Wheel and activate your virtual environment:
env/bin/python -m pip install --upgrade pip setuptools wheel
source env/bin/activate
Google Assistant has some dependencies which you should install into the virtual environment now.
sudo apt-get install portaudio19-dev libffi-dev libssl-dev libmpg123-dev
Finally, install the Google Assistant SDK, Samples, and OAuth tool.
python -m pip install --upgrade google-assistant-library
python -m pip install --upgrade google-assistant-sdk[samples]
python -m pip install --upgrade google-auth-oauthlib[tool]
That is everything needed to get up and running. If any of the installations fail, check the spelling and spacing thoroughly.
Authenticating the Raspberry Pi
Use the google-auth-oauthlib[tool] with the credential JSON file downloaded earlier to authenticate your Raspberry Pi.
google-oauthlib-tool --scope https://www.googleapis.com/auth/assistant-sdk-prototype \
--scope https://www.googleapis.com/auth/gcm \
--save --headless --client-secrets /home/pi/YOUR_CLIENT_SECRET_ID.json
You’ll need to replace YOUR_CLIENT_SECRET_ID with the downloaded file, so it is worth copying the filename first. This client ID must be correct. Do not change the filename!
You should get a message with a link, asking you to paste in an authorization code.

Clicking the link opens the browser. You’ll be prompted to enable the device on your Google account. Copy the authorization code which follows, and paste it back into your terminal window.
You should receive a confirmation reading Credentials Saved: /home/pi…, meaning the Pi has been authorized successfully with your Google account.
Testing It Out
Now that everything is in place, it’s time to test your Pi Google Assistant. Run the assistant with this command:
googlesamples-assistant-hotword --project-id my-dev-project --device-model-id my-model
You will need to replace my-dev-project with your Project ID (found under the Settings cogwheel of the Action Console). Your device-model-id is listed under the Device registration section of the Action Console.
Try it out! Say “OK Google” and ask a question. You can see the program output in the terminal as you hear the response:

That’s it! Google Assistant is now running on your Raspberry Pi. Note that if the output volume is a little low, you can change it by saying “Hey Google, turn your volume up to 80%.”
Bonus: Voice Activated GPIO
It is possible to control lights with an Arduino and Siri, but there is a simpler method. If you set up an LED, you can use the Google Assistant to control it with your voice.
Setting up Google Assistant to work with the GPIO pins is relatively simple, but requires some extra steps. Head to the Google Action Console, and find your device under Device registration. Click on it, and open the traits menu:

Turn the OnOff trait on, and click Save.
Now making sure you are inside the env virtual environment, clone a version of the SDK to your Pi using git:
git clone https://github.com/googlesamples/assistant-sdk-python
Since this is a virtual environment, you’ll need to install RPi.GPIO before moving forward.
pip install rpi.gpioNow, navigate to the folder containing the hotword.py script.
cd assistant-sdk-python/google-assistant-sdk/googlesamples/assistant/libraryModifying the Script
You’ll need to add a few lines to the hotword.py script, so open it in the nano editor:
nano hotword.pyUnder the import statements, add your own for RPi.GPIO.
import RPi.GPIO as GPIO
Look for the process_event method. At line 66, remove or comment out the print statement, and add an if statement to control the LED.
#print('Do command', command, 'with params',str(params))                                                    if command == "action.devices.commands.OnOff":
   if params['on']:
       print('---------------')
           print('Led turned on')
       print('---------------')
        GPIO.output(18, GPIO.HIGH)
else:
        print('---------------')
            print('Led turned off')
        print('---------------')

            GPIO.output(18, GPIO.LOW)
This logic controls the LED, but so far it isn’t configured to output. Set it up in the main() function before the process_event method gets called.
GPIO.setmode(GPIO.BCM)
GPIO.setup(18, GPIO.OUT, initial=GPIO.LOW)
Now the GPIO pin is set to output and initializes in a low state. Save and quit. You can run your modified script passing your model-id number (found in the Action Console) as an argument.
python hotword.py --device-model-id YOUR-MODEL-ID-HEREThe terminal output is the same as before, and the assistant will work as standard. Now however, when you say “OK Google, turn on” you will see a new output:

Note: The above image has been cropped, showing only the assistant hearing the request, and the print statement added to the script.
You should see your LED light up too!

Your Own DIY Raspberry Pi Google Home Assistant
This project is a good introduction to using Google API services. Now that you have a Google Assistant device, try some of the best Google Home commands—we’ve looked at some great Google Home mini games.
