Activity – 1 (Boat Race)
Introduction:
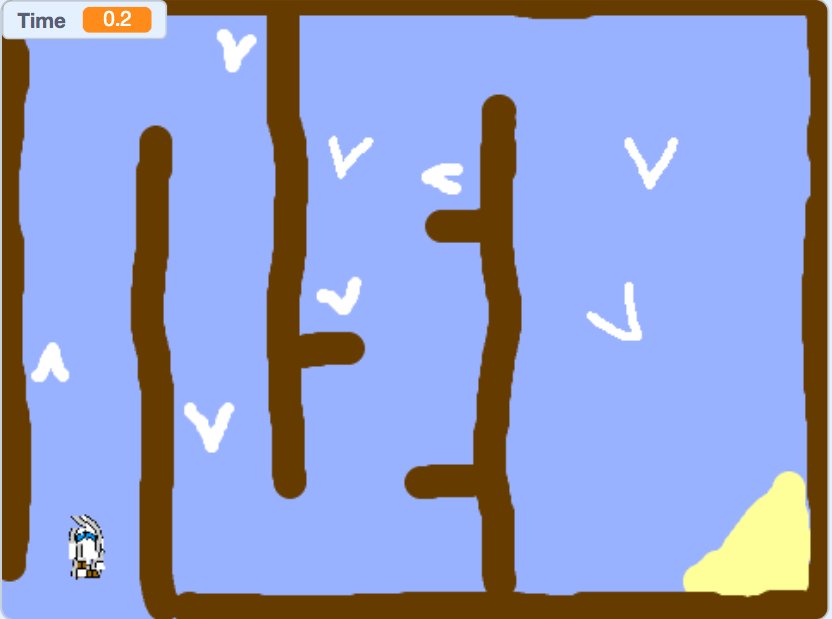
In this activity, you are going to learn how to make a racing game. The player uses the mouse to navigate a boat to an island without bumping into any obstacles
Materials
Computer or laptop, scratch
Procedure:
- Make sure you are signed into your scratch account.(see page 2)
- In your search bar type in rpf.io/boat-race-starter-on
- At the top of your page press “Remix”.

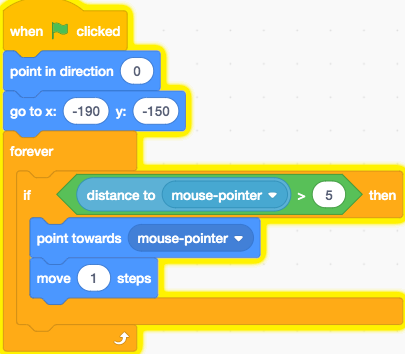
4. At the side of your screen you will see 9 buttons. Click on the yellow event button. We will call these commands.

5. Drag this block onto the blank working space

6. Press the blue motion command and drag this block underneath the previous yellow block. They should attach.
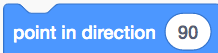
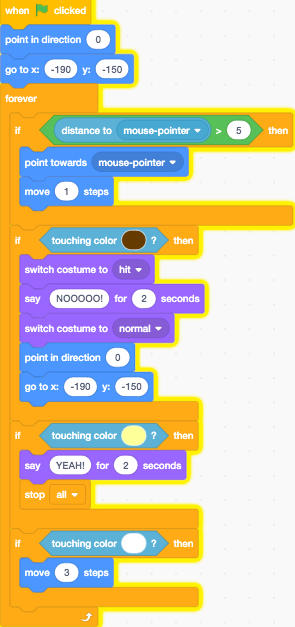
7. Click in the white circle of the “point in direction” block, and change it to “0”. This will allow your boat to start off straight
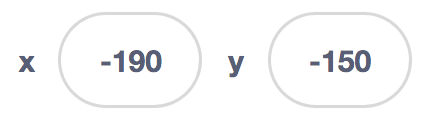
8. Drag this block underneath the previous block and make sure they are attached. In the first white circle beside the X, type in -190. In the second circle beside the Y, type in -150. What this will do is whenever you click the green flag at the top of your screen it will put you back to that position

You can always see your position of your boat right here
9. Click the orange control command. Drag this block underneath the previous block. Make sure that they are attached. Whatever you put in between this forever block, will happen forever until you hit the stop button.

10. Drag this block in between the forever block
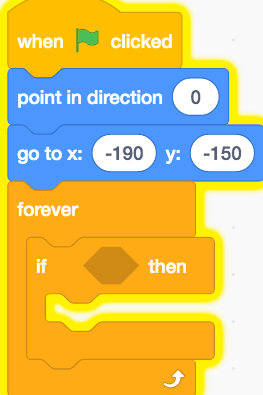
Your code should look like this so far
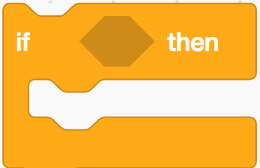
11. In the empty space in between “if … then”, drag this block into the empty spot. This block can be found in the operation command at the left side of your screen.

12. Under the sensing command, drag this block into the first empty spot of the green block.

It should look like this
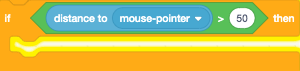
13. In the second white circle next to ” > ” type in “5”
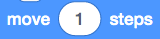
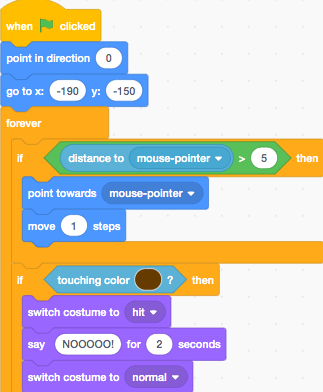
14. drag this block, inside the “if… then” block, making sure it is attached. This block can be found under the Motion command.

15. Drag this block underneath the previous block making sure it is attached. Change the number in the white circle to “1”. What this means is the boat should only point towards the mouse pointer and move if the distance to the mouse pointer is greater than 5 pixels.
Your code should now look like this
16. Test your code. Press the green flag at the top of your screen. Use your mouse to guide the boat. If done correctly, the boat should follow your mouse pointer.
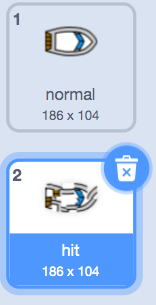
17. You will now be working on what happens when the boat crashes. First, click the costumes button at the top of the page.

18. You will need to duplicate your boat sprite. Right click on your mouse and click duplicate.
19. Rename your sprite so it says “HIT”
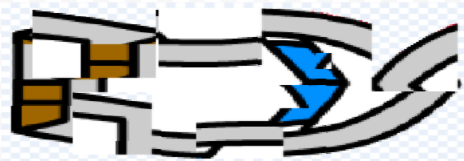
20. Select your “HIT” sprite costume and use the select tool to grab pieces of the costume and move, and rotate them, to make the boat look like it has crashed to pieces.

21. Your boat should look something like this when you are done
22. You will now add code to your boat so that it crashes and breaks up when it touches any brown wooden barriers. To do this you will need to add code blocks inside your forever loop so that your code keeps checking if the boat has crashed.
23. In the Control command, drag out this block and put it inside the forever command. This block should be attached to the other if… then block.
24. In the sensing command, drag out this block and put it in the empty space in between if… and then.

25. You will then select the colour. To do this, you will click the circle where it says touching colour. You will see at the bottom there will be a colour dropper. You will select the colour dropper and then select the brown wood.

26. Click the purple looks command and drag this block in side the “if… then” block.

27. You will then drag out this block and in the white circle type out “NOOOOO!”. Place this block underneath the “switch costumes to…” block. What this will do is when the boat hits an object it will switch to the broken boat costume you made and say “NOOOOO!”.

28. Drag out this block and put it underneath the previous block. Make sure in the drop down menu you select “normal”

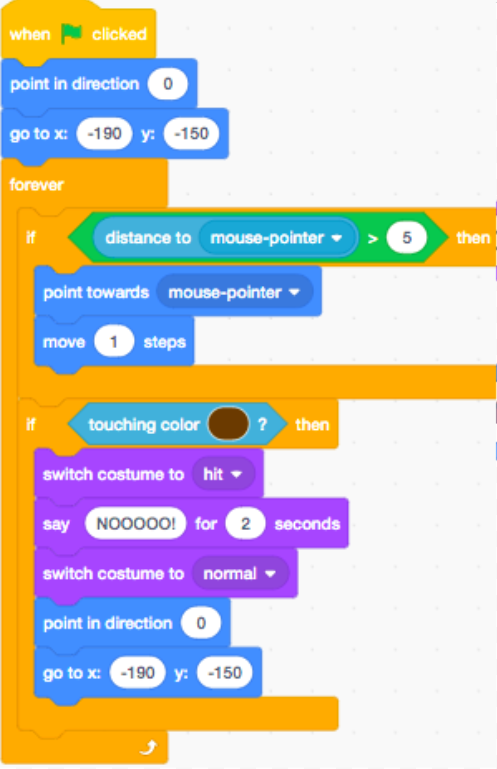
Your code should look like this so far
29. Drag out this block and put it underneath the “switch costume to … “block. Make sure in the white circle you type in “0”.

30. Drag out this block and put it underneath the previous block. Make sure in the x circle you type in “-190” and in the y circle you type in “-150.”

Your code should look like this
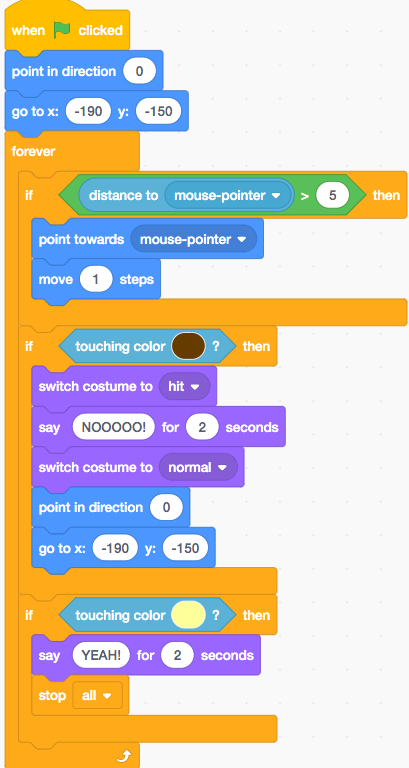
31. We will now make a code to win the game. To do this we will first need to drag this block inside the forever block. You will make this block attach to your previous if… then block.
32. You will go under the Sensing Command and drag out this block . Place this block in the empty space in between “if… then”.

33. You will then select the colour. To do this, you will click the circle where it says touching colour. You will see at the bottom there will be a colour dropper. You will select the colour dropper and then select the yellow triangle at the bottom right of your screen.
34. Now you will go under the looks command and drag out this block. Put it inside the “if… then” block. Make sure in the first white circle you type in “YEAH!” and in the second white circle you type in “2”.

35. You will go under the control command and drag out this block . Drag this block underneath the previous block. You can now press the green flag at the top of your screen to test what you have so far.

Your code should now look like this
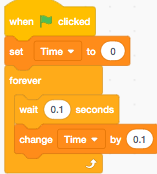
36. You will now add a timer to your game, so that the player has to get to the island (yellow triangle) as quickly as possible. To start this process, go under the variable command and click “make a variable”. Name this variable “Time” and make sure all sprites is selected. If Done correctly you will see this on your screen.

37. You will now start a new code to make the timer work. You will first need to drag out this block. You can place this block anywhere on the blank working space since you are starting a new code.
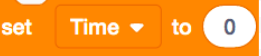
38. Under the variable command, drag out this block .Place it under the new, “when *green flag* clicked” block. Make sure the are attached. In the white circle type in “0”
39. Under the events command drag out this block. Attach this block to the “Set time to … ” Block
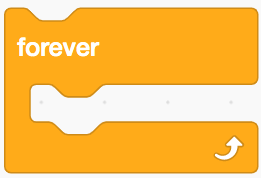
40. You will now drag out this block and put it inside the forever loop. Make sure you type in “0.1″ into the white circle

41. The last step for the timer is to drag out this block. Put this block inside the forever loop and attach it to the previous block. Make sure you type in white circle “0.1″

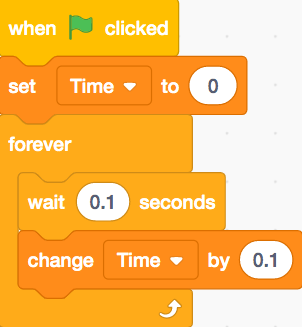
The code for your timer should look like this
42. Right now the game is too easy, so you will add obstacles and boosters to make it more challenging. To do this we will start off by changing the backdrop. You will first click on this (1) and then click this(2) . Pick the back drop that has the white arrow’s and delete the old one. You will now click back on your boat so you can see your code.


43. You will now add more code to your boat’s forever loop. (The code with more blocks)
44. Drag this block from the events command into the forever loop. This should attach to the previous “If … then” block
45. Drag this block from the sensing command. place this block in the empty space in between if… and then.

46. You will then select the colour. To do this, you will click the circle where it says touching colour. You will see at the bottom there will be a colour dropper. You will select the colour dropper and then select one of the white arrow’s that is on your screen.

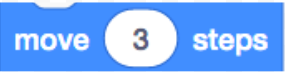
47. Now you will go under the motion command and drag out this block. place this block inside the “If … then” block. In the white circle type in “3”.
48. Your game is now finished. See below for the finished code